Norse plaque inspired by an old fireback
- By nygren
- Mon 14 May 2012
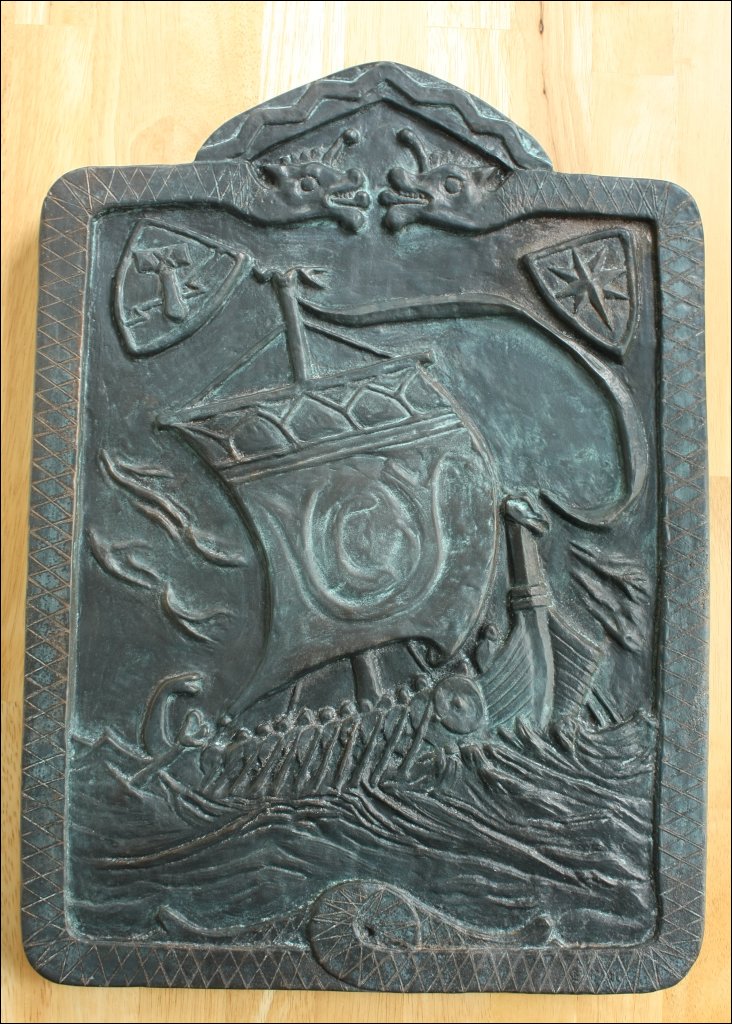
Ever since my early childhood I have fond memories of going to Camp Happy, my great aunt and uncles summer home up in Door County, Wisconsin. The home was supposedly built as a replica of a hunting lodge from the Old World. Installed above the fireplace was a wonderful bronze relief with a Norse design. A viking ship tosses on a stormy sea below shields likely representing Thor and Odin, and two serpents form the border. I have many wonderful memories of family up at Camp Happy; watching the sunset over the great lakes, eating out on the screened-in porch, walking through the woods out to High Bluff, but especially relaxing and talking into the night in the fire-lit living room.
For years I've had a desire to make a replica of the bronze plaque above the fireplace mantle, so last year I started on the project. While I wanted to get an end result that was very close in style, I wasn't aiming to end up with an exact copy. After about six months of working on-and-off on the project in some spare time over the weekends, I was successful. Here's the final version installed next to my parents' fireplace in California:

The completed plaque installed on my parents' fireplace.
To give some context, below is the original plaque installed in Camp Happy's fireplace mantle. While I'm not sure of its origin story, one possibility is that it is a bronze casting of cast iron fireplace fireback.


The process I followed to create this...
 Backing board for setup to pour wax from a double-boiler. Packing tape was used for the side-walls of the mold.
I started off by printing a photo of the original scaled to the desired size and overlain with a grid. From this, I took a piece of MDF and cut it to the right shape to make the backing. While I used 1/2" MDF, this ended up resulting in a much thicker casting in the end. I would have been better off using a much thinner backing board (such as 1/8").
 Part way through pouring the wax. A digital thermometer was used to control the temperature of the double-boiler.
I leveled the backing board on a table, put nails into it to gauge height, and used sides of packing tape to make a mold. Donning appropriate protective gear (full face mask, respirator, long-sleeves, and working outside), I used a in improvised double-boiler to melt "Victory Brown" sculpture wax and then poured it onto the backing board to the desired depth. (If you try this, make sure to take appropriate safety precautions!)
Once it cooled, I cleaned up the wax surface and edges using various carving tools so that I would have a good blank to start from.
 The wax blank after some cleanup and smoothing to make it flat.
Next, I used a loop tool to rough-in the design. In retrospect, I ended up carving deeper than I probably intended to, resulting a deeper relief. If I was to do this again I might start off carving more shallowly.
 Roughing-in the design, primarily using ribbon tools.
I worked from the upper left corner down to the bottom right corner. I was primarily using wax carving tools, along with a metal loop tool. I also would sometimes use a piece of canvas or nylons to smooth our the wax (almost acting like sandpaper).
 In-progress, but no cleanup yet. Working on the details from the upper-left down to the lower-right.
Below is the initial completed version before I refined it... One thing I changed was the symbol in the upper right shield. It seemed to be impossible to find a Norse symbol for Odin or the sun that hasn't been subverted so I finally just made something up that fit the space and still looked a little like a sun.
 Initial version before refinements.
I took it over to the foundry and got a number of suggestions for things I needed to do differently before casting it. In particular, I needed to smooth the edges so the sand wouldn't catch, make sure that everything had enough draft (diagonal slope) and no undercuts, and then coat it with a hard lacquer so that the sand wouldn't stick to the wax. I also used the opportunity to make some improvements suggested by my mom: improving the leading edge of the sail and changing the position of the oars to give them a more definitive line.
 The final wax, before being laquered and cast. Refinements included changing the oar location, the sail shape, and ensuring that there was a proper angle everywhere to get a good draft.
 Close-up of the final wax.
 Close-up of the final wax.
With the wax prepared, I took it over to Mystic Valley Foundry in Somerville and had them make two aluminum sand castings. (Given the thickness due to the backing board, bronze would have been way too heavy.)
 The aluminum sand castings, just back from Mystic Valley Foundry
The castings came back in about two weeks. Each of them had its own natural imperfections from the casting process. The next step was to take one of them and clean it up. After a day with a dremel tool and hand files, I had the piece cleaned up nicely.
 One of the castings after being cleaned up with a dremel tool and hand files.
To prepare for finishing, I primed the plaque with an aluminum spray primer so that the top coat would bond better.
 After priming with self-etching aluminum primer.
I then used an airbrush to apply Modern Masters reactive bronze paint. (I'd experimented with some other types of coatings to get a bronze finish, and I'd also tried applying this with a brush, but neither worked well enough.) As with all of the other steps (spray painting, using the dremel tool, etc), having adequate face protection is key. The 3M full-facepiece respirators work well as they don't fog up like separate googles and respirators do.
The result of the bronze spray painting turned nicely, and might not have been a bad place to stop, but it looks a little too "new".
 After airbrushing with Modern Masters bronze paint.
I then applied the a second coat of paint and while it was still wet applied the Modern Masters blue patina aging solution. After it was on for a bit, I wiped it off to stop the reaction.
It turns out to be very fussy to get the right look out of the patina. I tried doing some touch-up, but it seemed like each time I tried I made things a little worse. I finally decided to stop. One lesson I learned a little too late is that the blue patina aging solution leaves some white copper salts behind. After the paint has dried you can remove them with a damp towl for a better end result.
 After applying patina


To install the plaque, I mounted some brackets in the back and used those to hang it on the fireplace. I'm quite pleased with the finished result. We also setup a spotlight with an MR16 GU10 LED bulb for illumination at light.
Now that it's done I'll need to figure out what project to work on next --- after we finish our kitchen remodel. At some point I should also finish up the second one, as well as see how well I can make a resin casting (which might be much cheaper and lighter than the aluminum casting, albeit not as nifty).
 Me with the finished plaque in-front of my parents' fireplace.